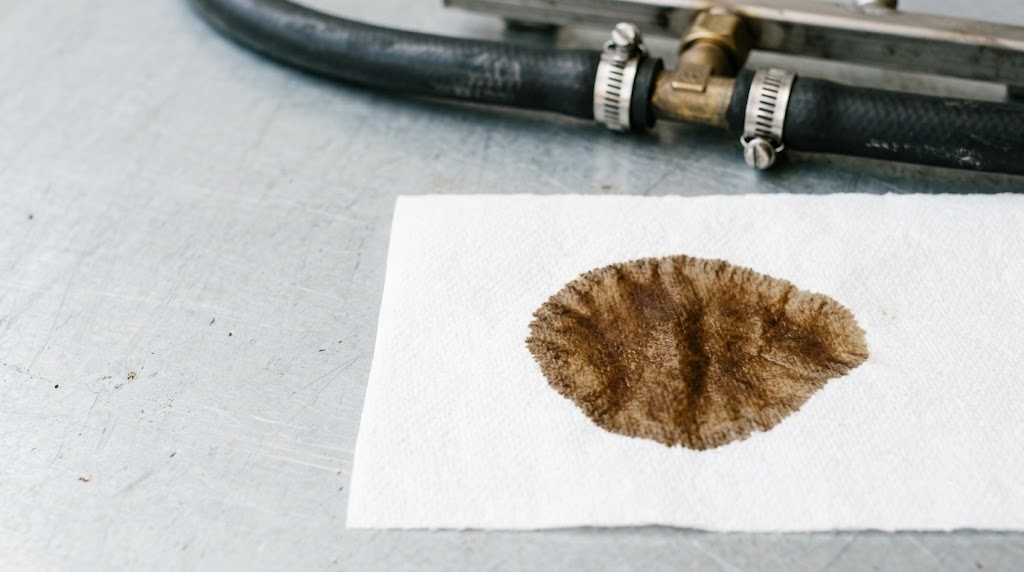
Most fuel leaks don’t start where you think. They don’t announce themselves at the fitting you just touched — they hide in the section of line you didn’t look at twice. You chase the smell, find a puddle under the mower, and assume it’s the clamp or the filter you worked on last. Then you replace it, and the leak comes back a few weeks later.
That’s because the real culprit is usually older than the last part you touched. Rubber hose doesn’t crack from a single event — it hardens over seasons of thermal cycling, long before anyone gives it a second glance. So the answer to why is my lawn mower fuel line leaking is rarely about what broke yesterday. It’s usually about what had already been failing for a while.
We supply rubber fuel line for small engines, so we see the same pattern repeat across shops, dealers, and owners. This guide covers the four causes behind almost every leaking fuel line we hear about, how to trace a leak without tearing the machine apart, and how to decide between a repair and a full replacement.
Fuel Line Leak Causes: The Short Answer
- Nearly every leak traces back to four things: aged rubber hose, loose or worn fittings, failed clamps, or the wrong hose material.
- Diagnose in order, not by guesswork — a visual pass first, then a paper-towel test for slow seeps.
- If you smell fuel but see nothing wet, the leak may be permeation through the hose wall rather than a joint.
- Repair an isolated fitting. Replace an aged run. If one section has failed, the others are usually close behind.
- Never run the engine with an active leak. Shut it down and fix it first.
Safety Before You Start Looking
Do these first. Gasoline vapor ignites at concentrations as low as 1.4% in air — roughly one part vapor to seventy parts air, well inside what a leaking mower can produce in a closed garage. The upper limit of the flammable range is about 7.6%. (Both figures are published by OSHA and NIOSH.)
- Shut the engine off and let it cool. A hot muffler is an ignition source sitting inches from the fuel line.
- Eliminate ignition sources. No smoking, no open flames, no tools that can spark.
- Ventilate the area. Open the garage door and work outside if you can. Fuel vapor is heavier than air and pools low, so it needs airflow to disperse.
- Disconnect the battery on machines that have one. A loose terminal or an accidental short while you work can ignite vapor you can’t see.
- Have absorbent material ready — rags, shop towels, or cat litter. Not water. Water spreads gasoline instead of containing it.
Once the area is secure, move to diagnosis.
Cause #1: Aged, Hardened Hose
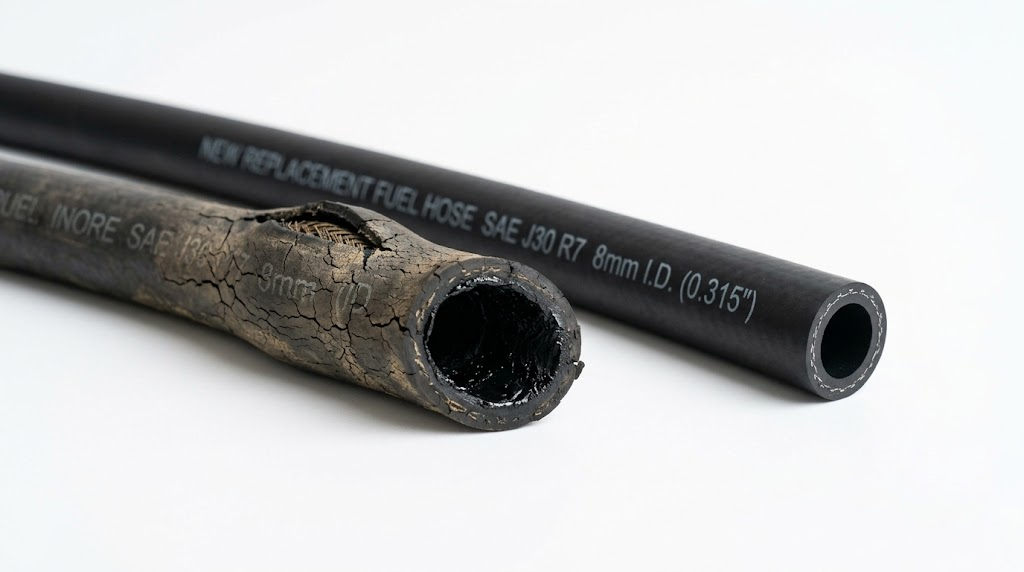
Rubber fuel hose doesn’t last forever, and it fails from the inside out. Heat, oxygen, and ozone work on the rubber over time. Every heat cycle expands the hose and lets it contract again, and after thousands of cycles the material loses its flexibility and turns brittle. The cracks that matter most are the ones you can’t see: hairline fractures radiating from bends and clamp positions, or a crumbling inner wall that sheds debris toward the carburetor.
Two things speed this up. One is heat — a line routed close to the muffler or the cylinder fins ages faster than the same line routed in cool air. The other is ethanol-blended fuel, which acts on rubber differently from heat: instead of hardening the hose, ethanol swells and softens it and pulls plasticizers out of the compound. We come back to that in Cause #4. Either way, the result is a hose that can no longer hold a seal.
In practice, we see hardened lines most often on machines that sit between seasons — mowers stored over winter, equipment that waits months for a part. The hose looks fine from arm’s length. Up close, the tell is in the bends.
If your mower is still running its original line and it has been through a few seasons, check it. Replace on condition rather than on a calendar: a hose that’s hard, cracked, or swollen has finished its working life regardless of how many seasons it has on it.
Cause #2: Loose or Worn Fittings
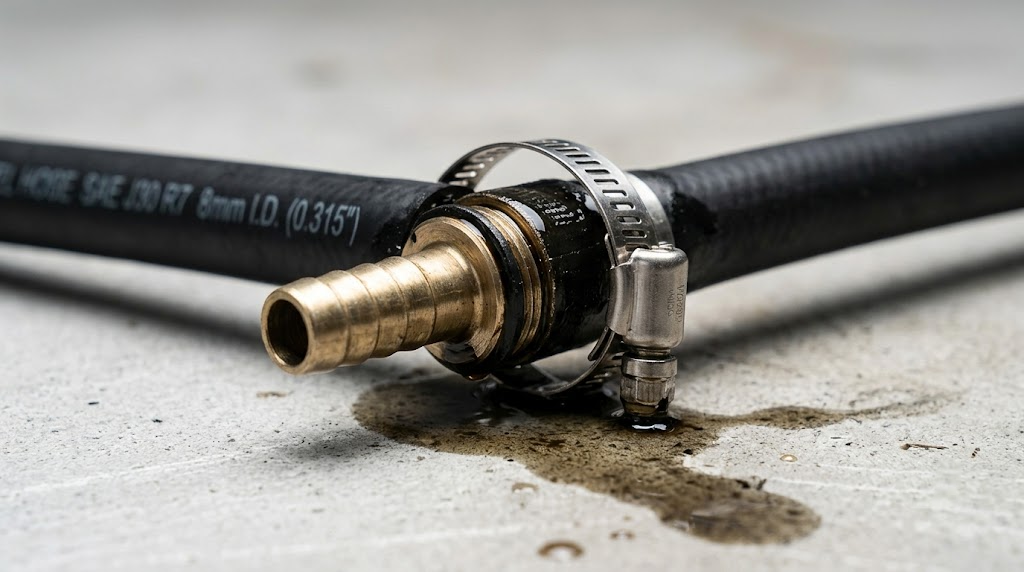
Fuel lines only hold fuel because the connections are sealed. Those connections wear in predictable ways. On push-lock fittings, a hose that was never pushed fully home can creep back off the barb under vibration. On clamped barbs, the hose end hardens with age and loses its grip even though the clamp itself hasn’t moved. And a barb that is pitted or cracked won’t seal no matter how much you tighten it — you’re tightening against a damaged surface.
Sizing mistakes cause leaks here too. A hose one size larger than the barb will never seal: the clamp simply squeezes the hose without pressing it against the barb, so there’s no sealing contact at all.
Finding this kind of leak takes more than a glance. Run the engine and watch the connections — a slow seep may only appear after the machine has been running for a few minutes and the hose has warmed up. Wipe the joints dry with a clean paper towel, run it, then look again. That method will find more leaks than any amount of staring.
If you do find a leaking connection, reseat the hose or replace the fitting. Don’t just add torque. A hardened hose end or a damaged barb won’t reseal, and over-tightening can crush the hose and set up the next leak.
Cause #3: Failed Clamps
Clamps are the simplest part of the system and one of the most common causes of leaks. Spring clamps lose tension with age — that’s how they work, and it’s why they get replaced rather than reused. A clamp that has been removed and refitted a few times has already given up some of its grip. And a clamp in the wrong position won’t seal at all, no matter how tight it feels.
Position matters more than most people realise. The clamp needs to sit on the hose inside the sealing zone, just behind the raised ridge of the barb on the hose side. Put it on the bend of the hose, or half past the end of the barb, and it holds nothing.
We see the same mistake regularly: an old clamp reused on a new hose because it still looked fine. A few weeks later it has relaxed enough for the hose to creep off the barb under vibration. The leak starts as a faint smell and becomes a wet joint.
Use new clamps whenever you replace a line, and match the clamp type the machine was built with. A clamp that has already lost its tension won’t grip a new hose properly.
Cause #4: The Wrong Hose Material
Not every hose can carry fuel. When the material is wrong for the application, it degrades quickly. These are the mismatches we run into most:
- Vacuum hose or garden hose used as fuel line. Neither is formulated for fuel. Vacuum hose swells, softens, and can shed material from its inner wall once it meets gasoline. There’s nothing wrong with the hose — it was built to carry air.
- Standard silicone on a gasoline system. Silicone handles heat well, which is why it shows up on coolant and vacuum lines, but gasoline makes it swell and break down.
- Ethanol blends in a line that isn’t rated for them. Ethanol is a solvent. It works on rubber differently from heat: rather than hardening the hose, it swells and softens it and leaches plasticizers out of the compound. A standard rubber line still works with pump gasoline, but it ages faster on ethanol blends — so check it more often, and move to a lined or barrier hose if you’re running high-ethanol fuel.
If you’re not sure what your machine needs, match what it came with. The factory line is the best specification you have — it tells you the material and the size the fuel system was designed around.
For more on matching hose to fitting, fuel type, and application, see our guide on choosing the right lawn mower fuel line size.
Why You Smell Fuel but Can’t Find the Leak
This is the case that sends people in circles: a clear fuel smell, no wet spot anywhere, and a mower that starts and runs normally. If you have wiped every joint and still can’t find the source, the fuel may not be escaping from a connection at all. It may be passing straight through the hose wall.
That’s called permeation, and it’s a normal property of every rubber hose rather than a defect. Fuel molecules work their way through the wall and evaporate on the outside, which is why you can smell fuel and still find nothing wet. The rate varies enormously by grade — a standard low-pressure fuel hose can permeate on the order of hundreds of grams per square metre per day, while a hose built with an inner barrier layer cuts that down by roughly an order of magnitude. It’s the same fuel, the same system, and a completely different result.
Two things push permeation higher. Ethanol blends raise it, and heat raises it again, which is why the smell often turns up after the engine has been running or after the machine has been sitting in a hot shed all afternoon.
What to do about it:
- Rule out a real leak first. Confirm the joints are dry before you accept a permeation explanation. A permeation smell is faint and diffuse; a leak that will darken a paper towel is a different problem and needs to be fixed.
- Check the age of the line. A hose that smells strongly and has several seasons behind it has earned replacement — permeation gets worse as the rubber ages.
- Replace with a barrier or lined hose if the smell matters where the machine is stored.
- Don’t dismiss it. “It’s only a smell” is true right up until the vapor finds an ignition source.
How to Find the Leak, Step by Step
Work through the system in order instead of poking at it at random. On most small engines the fuel path is short, so a full pass takes only a few minutes:
- Tank outlet — where the line leaves the tank, including the grommet or fitting it passes through.
- Tank to filter — the whole run of hose, not just the ends. Run your hand along it and feel for soft spots or stiffness.
- The fuel filter itself — the inlet joint, the outlet joint, and the seam around the filter body. A filter that has been in service for years can seep at that seam, and it’s easy to overlook because the filter looks like a solid part.
- Filter to carburetor — again the whole run, watching for chafing where it passes a bracket or the edge of a shroud.
- Carburetor inlet — the joint most people check first, and often not the one that’s leaking.
- Return line, if fitted — some machines run a second line back to the tank. It leaks in the same ways the supply line does, and it’s easy to forget it exists.
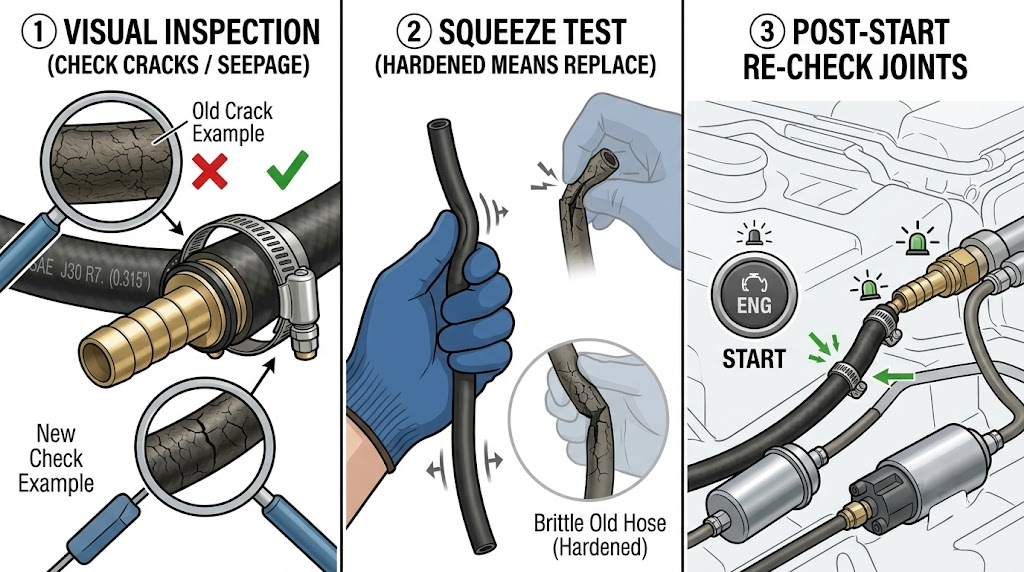
Visual check. Look for wet spots, staining, or a damp sheen along the hose. Fuel usually leaves a slightly dark, greasy-looking mark rather than a clean drip, so look for discoloration as much as for drops.
Paper-towel test. Wipe a suspect area dry with a clean paper towel, run the engine for a few minutes, then wipe it again. Fresh fuel shows up as a dark, spreading stain. This is the only reliable way to catch a slow seep — the kind that never forms a puddle.
Squeeze test. Squeeze the hose along its length. If it feels hard or brittle, it’s finished. If it feels soft or spongy, the material is breaking down. Either way, it gets replaced.
If you’re not comfortable chasing a fuel leak, hand it to someone who is. Fuel systems hold flammable liquid and vapor under conditions you can’t fully control, and safety comes before saving a repair bill.
Repair or Replace: How to Decide
Not every leak calls for a full replacement. The decision usually comes down to where the failure is and how old the rest of the line is.
Repair when:
- The leak is isolated to a single fitting or clamp.
- The hose around it is still soft, with no cracking, swelling, or stiffness.
- Resealing the joint restores full integrity — the barb is sound and the hose seats properly on it.
Replace the run when:
- More than one section shows wear or damage.
- The hose is hard, cracked, or swollen at the ends.
- The wrong material or size was installed originally.
- The line is several seasons old and you’re already in there with the tools out.
Here’s the part that isn’t obvious: a repair on an aged line tends to come back. Hose ages along its whole length, so the section that failed is usually just the first one to show it. Replacing the full run costs a little more up front and saves pulling the machine apart again in two months.
For the complete procedure, see our step-by-step guide on how to replace a lawn mower fuel line.
And while you’re replacing the line, check what else has aged along with it. The fuel filter, the tank grommet, and any pulse line on the same machine are usually the same age and in similar condition. For the wider picture on hose sizes and how they fail, see our guide to rubber fuel line for lawn mowers and small engines.
FAQ: Small Engine and Lawn Mower Fuel Line Leaks
Why is my fuel line leaking after I just replaced it?
The two most likely causes are an old clamp that has lost its tension and a hose that wasn’t pushed fully onto the barb. Check every connection you touched, confirm each clamp is sitting just behind the raised ridge of the barb, and make sure you fitted new clamps rather than reusing the old ones.
Can I patch a fuel line with tape or epoxy?
No. Gasoline dissolves adhesives, and neither tape nor epoxy survives continuous fuel exposure. A patch might hold long enough to move the machine somewhere safe, but it isn’t a repair. Replace the damaged section.
How often should a lawn mower fuel line be replaced?
There’s no universal interval, and the manufacturers who publish one don’t agree with each other — some give an operating-hour figure, others an inspection interval. So the practical rule is to inspect the line every season and replace it on condition. If it’s hard, cracked, swollen at the ends, seeping, or leaving black residue on your fingers, it’s finished.
Is it safe to run the engine with a small fuel leak?
No. Even a slow leak produces vapor, and vapor is what ignites. Shut the engine off, fix the leak, then run it. There is no leak small enough to leave in place.
What’s the right way to fix a fuel line leak?
For a hose: replace the section — or the whole run if the hose shows any sign of age — and fit new clamps. For a fitting: reseat the hose properly or replace the fitting. Tightening the existing clamp rarely fixes anything, because the leak is usually caused by the hose or the barb rather than by a loose clamp.
Why do I smell gasoline but can’t find a wet spot?
That’s usually permeation — fuel escaping through the hose wall rather than through a joint. It’s covered in more detail above.
Fixing a Leaking Fuel Line: What Matters Most
So why is your fuel line leaking? Nearly every case comes down to age, a loose or worn connection, or a hose that was never right for the fuel in the first place — rubber that has hardened, a clamp that has given up, or a length of vacuum hose someone pressed into service. Those four causes account for almost everything we see come back.
If you take one thing from this, make it the inspection habit. Check the line every season and replace anything that’s hardening, swelling, or cracking before it starts to weep. A leak caught at the smell stage is a ten-minute job. The same leak in July, with the mower full of fuel and the engine hot, is a different kind of risk altogether.
We supply rubber fuel line for small engines in the sizes mowers actually use, along with clamps and kit configurations for repair shops and dealers. See our small-engine fuel line range for bore sizes and specifications, or contact us with your machine list or your own specifications for a quote.