Cold start, and there’s a ticking under the car that gets faster as you pull away. Or you park in the garage, walk past the tail, and catch that sharp unburned-fuel smell.
Both point to the same place more often than not: the flex pipe.
It’s the braided or corrugated section between the manifold and the converter — a short length of pipe designed to absorb engine movement so the rest of the exhaust doesn’t crack from vibration. It’s also the part of an exhaust system that fails earliest, because absorbing vibration is exactly what wears it out.
The good news is that a flex pipe leak usually starts small, and small leaks have small fixes. The bad news is that the fix that works at one stage does nothing at the next. Getting that right is the whole job.
How Do You Know the Leak Is From the Flex Pipe?
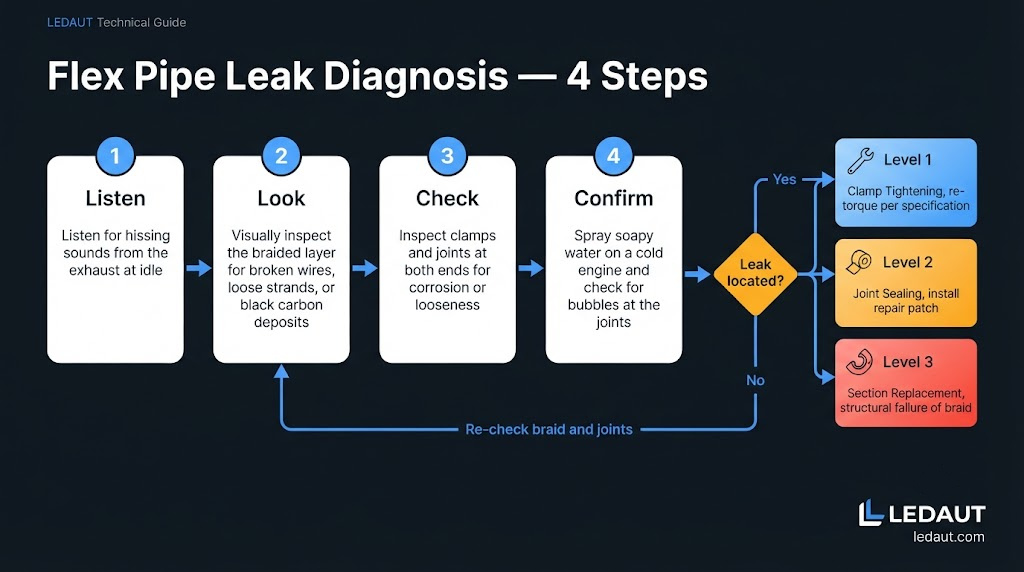
Before you buy anything, confirm where the leak actually is. Most people replace parts they didn’t need because they assumed the failure point.
Listen to it. A flex pipe leak ticks or pops, and the sound changes with temperature — loudest when cold, quieter once the pipe heats and expands. It speeds up with engine RPM. A steady roar that doesn’t change with temperature is more likely a gasket or a joint.
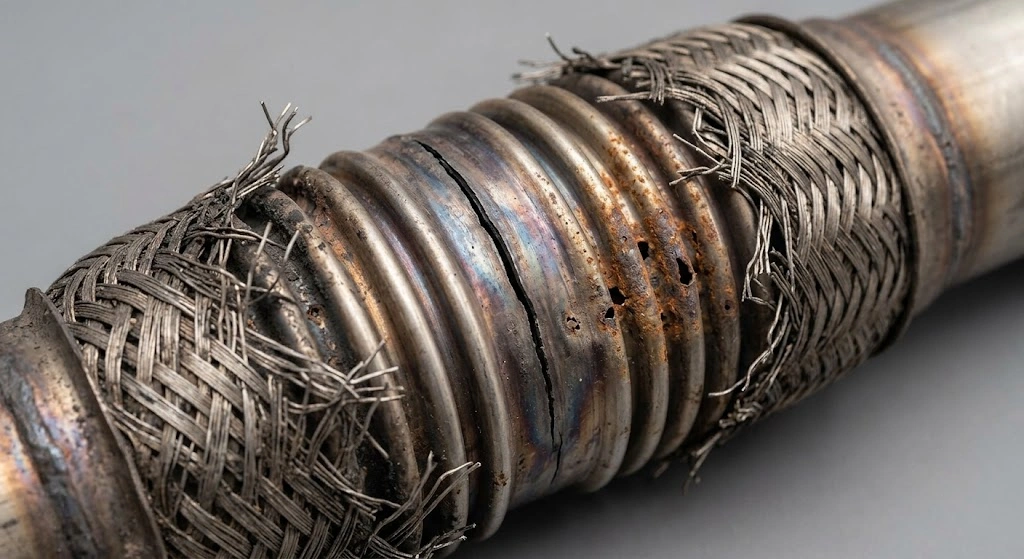
Look at the braid. Get under the car with a light. On a braided flex pipe, look for broken wire strands, a rusted-through spot, or black soot tracks fanning out from one point. Soot is the most reliable visual tell — exhaust always leaves a stain where it escapes.
Check both ends. Cracks at the weld collar are common, and a clamp that has shifted leaves a clean gap where it used to sit.
Feel for the pulse. With the engine idling (and the car safely supported), hold a gloved hand a few inches from the pipe. A leak pushes a rhythmic pulse of hot gas you can feel without touching metal.
Confirm with soapy water. Cold engine, spray a soap solution along the braid and the joints, start it, and watch. Bubbles form at the leak. This is the step most people skip, and it’s the one that stops you from replacing a good pipe.
7 Signs Your Flex Pipe Is Failing (and Which One Means Stop Driving)
The checks above tell you where the leak is. These are the symptoms of a bad flex pipe — what the car does before you have been under it. They run from what people notice first to what should stop the car.
- A rattle at idle that was not there last year. The braid is the part that absorbs engine movement. Once it stiffens or frays, that movement goes into the floorpan and the steering wheel instead. You feel it most in Drive at a red light, foot on the brake.
- A hiss or whistle under throttle, gone the moment you lift. A cold-start tick is gas escaping on its own. A hiss is different — it means pressure is pushing gas out, so the leak opens under load. Loudest climbing a hill or merging, silent at cruise.
- Fuel economy drops without a change in how you drive. The upstream oxygen sensor samples outside air at the leak and reads lean. The ECU answers by adding fuel. One to three miles per gallon, plus a rich smell at idle that was not there before.
- A check engine light reading P0171 or P0420. P0171 is bank 1 running lean, which is the leak sitting upstream of the sensor. P0420 is catalyst efficiency below threshold, which shows up later, after unburned fuel has cooked the converter. Neither code names the flex pipe, but on a car past 100,000 miles a leak is the usual reason for both.
- Exhaust smell inside the cabin, worst when stopped. The leak sits close enough to the firewall that gas enters through the shifter boot, the door seals, or the fresh-air intake. It is strongest with the windows up and the car stationary. This one is a health issue rather than an annoyance.
- It started after a scrape, a speed bump, or a curb. The flex section hangs lower than the rest of the system, so it meets the obstacle first. One impact can finish off a weld collar that was already fatigued, which is why the noise often appears on a specific day rather than gradually.
- Black soot or an orange rust bloom on the braid. The only one on this list you cannot notice from the driver’s seat. A dry black stain fanning out from a single point is escaped gas. Orange-brown staining means the wire is going.
Two or more of these symptoms lining up is enough to treat it as a flex pipe leak until a soapy-water test says otherwise. One of them should not wait for the weekend: exhaust inside the cabin is carbon monoxide, and a small leak still puts it there. Everything else on this list gives you time to plan.
None of these symptoms explain why the pipe failed. For that you have to look at where the braid gives out, which is the next section.
Why Flex Pipes Leak: The Failure Mechanism
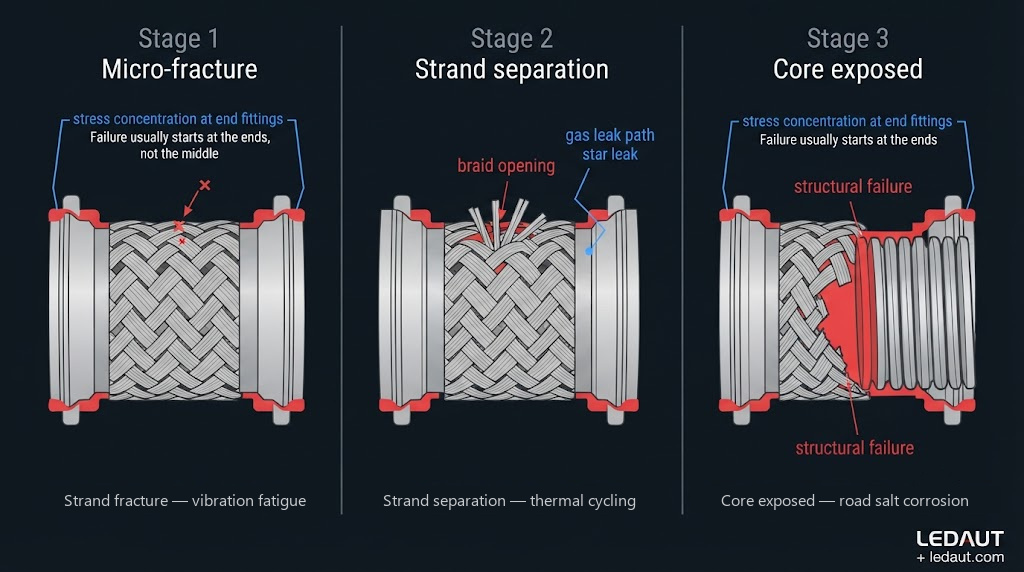
A flex pipe doesn’t wear evenly. It fails at the ends.
The engine rocks on its mounts — more under load, more with worn mounts, more in a four-cylinder than a smooth inline-six. The flex section absorbs that motion so the rigid piping downstream doesn’t have to. The trade-off is that the movement concentrates stress exactly where the flexible section meets the solid end collar.
That’s why the braid frays from the ends inward, not from the middle out.
Once one wire breaks, the load redistributes to its neighbors. They fail faster. Then the hole opens, and hot gas starts cutting the material around it. From the first broken strand to a leak you can hear is usually a matter of months — enough time to notice a change in sound, not enough time to ignore it.
This mechanism explains the most common bad fix: tightening the clamp on a braid failure does nothing. The leak isn’t at the joint. There’s no gap for the clamp to close. The gas is coming through the wall of the pipe, a few inches upstream of where the clamp sits.
Level 1 — Loose Clamp: Retorque and Reuse
Sometimes the pipe is fine and the joint isn’t. This is the cheapest fix and the one to check first.
How to tell you’re at Level 1: the braid looks intact, the soot stain sits at the joint between the pipe and the collar, and the clamp looks shifted or sits unevenly.
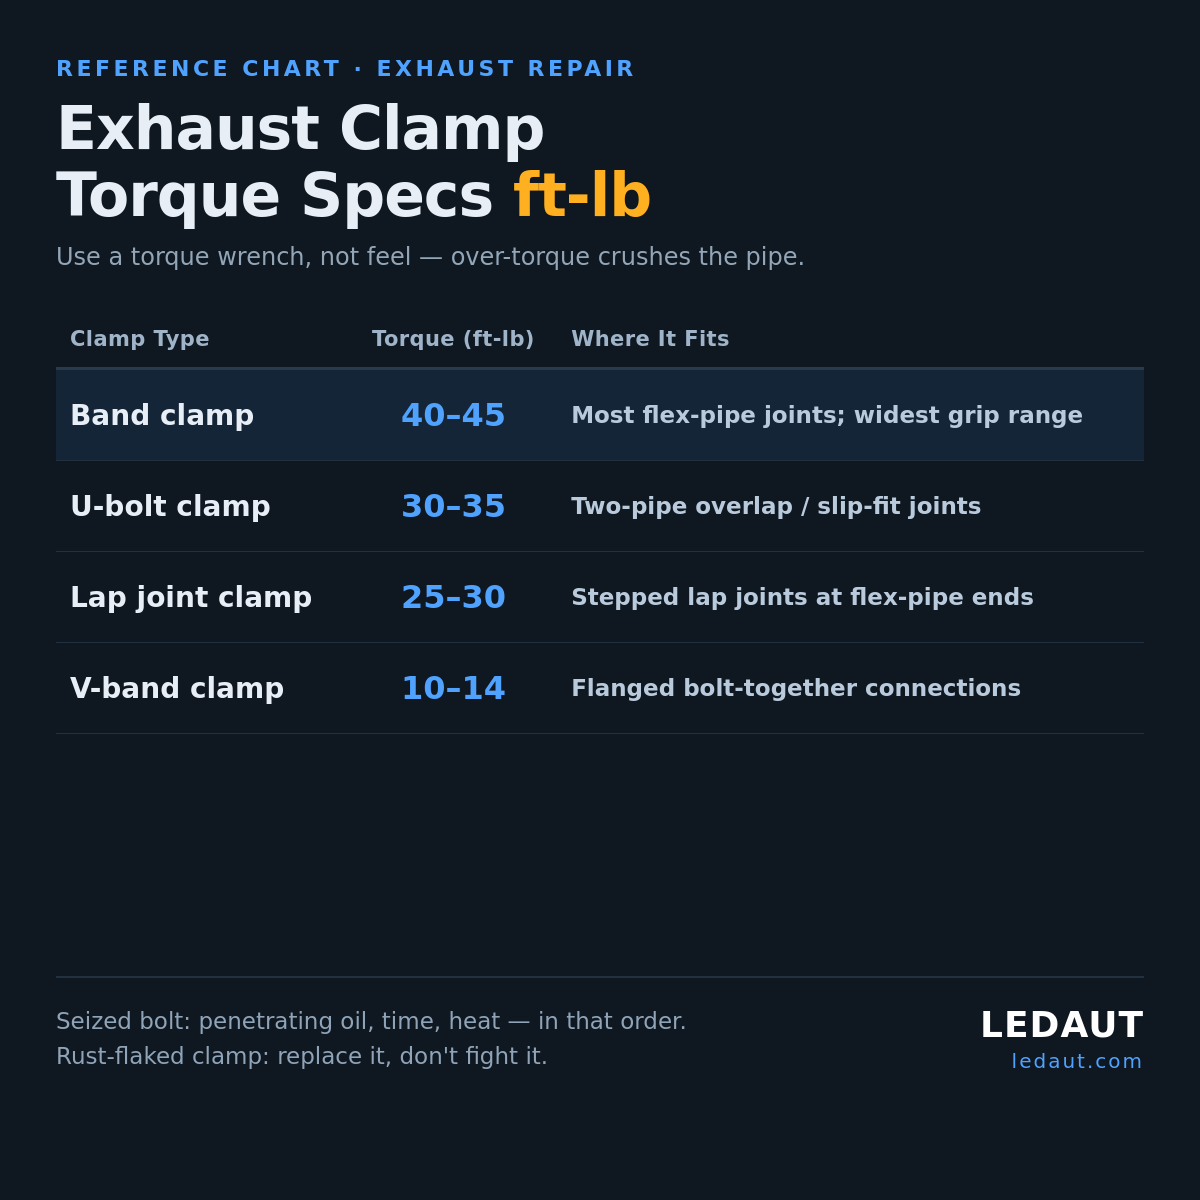
Retorque to spec. Torque values matter here, and they’re not interchangeable across clamp types — band clamps take 40–45 ft-lb, U-bolt clamps 30–35 ft-lb, lap joint clamps 25–30 ft-lb, and V-band clamps 10–14 ft-lb.
Use a torque wrench, not feel. A U-bolt overtightened past spec crushes the pipe and creates a permanent leak at the deformed section — you’ll chase that one for weeks.
If the fastener is seized: penetrating oil, time, and heat in that order. Don’t shear the bolt. On a clamp that’s rusted to the point of flaking, replace it rather than fighting it — clamps are cheap and a re-used clamp at the wrong tension is a leak you’ll revisit.
When Level 1 doesn’t work: if you torque to spec and the noise is still there, the leak isn’t at the joint. Move to Level 2 or 3.
If you’re not sure which clamp you’re looking at, the exhaust clamp types guide covers the four families and where each one belongs.
Level 2 — Small Holes: Weld-Free Patch Options
When the braid has a small hole but the pipe structure is still sound, there are temporary repairs that will get you through a week or a season.
How to tell you’re at Level 2: a visible pinhole or short split in the braid, no widespread fraying, and the pipe still holds its shape when you push on it.
The options, honestly assessed:
Patch clamp. A metal sleeve with a high-temp sealant that clamps over the damaged section. It works well on a small, contained hole in a straight section. It does not work on a hole at a bend or where the braid is unraveling — the clamp can’t seal a surface that keeps changing shape.
Exhaust putty or tape. A field fix. It fills a hole and holds until heat cycling and vibration break the bond. Expect to redo it. It is not a repair you schedule around; it’s a repair you do when you need the car tomorrow.
A sleeve with two clamps. Cutting out the damaged section and clamping a sleeve over it. More durable than putty, but it only works when the damage is contained and the surrounding pipe is solid enough to clamp to.
The honest limit on all three: they are temporary. None of them restore the flexibility the flex section was there to provide. The vibration that caused the leak in the first place keeps working on the repaired area.
When to skip Level 2 entirely: if the braid is fraying across more than a small area, if the inner core is visible, or if the hole grows while you’re looking at it — go to Level 3. Patching a failing flex pipe wastes an afternoon and buys you a week.
Level 3 — Replace the Flex Pipe
This is the real fix, and it’s the right answer more often than people want to hear.
How to tell you’re at Level 3: broken strands forming a ring around the braid, a hole that’s visibly enlarging, the inner corrugated core showing through, or a patch that failed in the same spot twice.
If you’re unsure whether you’ve crossed that line, the when to replace a flex pipe guide lays out the judgement criteria in more detail.
Choosing the replacement. Flex pipes come in three constructions, and they’re not equivalent:
- Interlock — interlocking steel profile, the toughest against vibration and heat. Common on diesel and heavy-duty applications.
- Braided mesh — the general-purpose gasoline passenger-car choice, and the most common aftermarket part.
- Bellows — corrugated, smooth internal flow and low restriction, used where performance matters.
The exhaust flex pipe types overview compares them in detail if you’re choosing rather than just replacing like-for-like.
Match the dimensions. Measure the pipe diameter and the overall length before ordering. A flex section that’s too short puts the same stress back on the joints. Too long and it can contact the body or the heat shield.
Installation itself — cutting, fitting, welding or clamping — is covered step by step in the flex pipe installation guide. Don’t guess at the fit-up if you haven’t done one before.
What Happens If You Leave It
A flex pipe leak isn’t just noise, and it’s worth understanding why before you decide to live with it.
Exhaust can enter the cabin. The flex pipe sits forward of the catalyst, which means what’s leaking is raw exhaust — including carbon monoxide, before it’s been converted. At a stop, with the HVAC on fresh air, that gas can be drawn into the passenger compartment. This is the reason a leak near the firewall gets fixed promptly rather than eventually.
The engine reads wrong. An oxygen sensor downstream of a leaking joint sees diluted readings. The ECU adjusts fuel based on numbers that don’t reflect what’s actually happening, which shows up as poor economy, rough running, or a check-engine light that seems unrelated to the exhaust.
The damage grows. Hot gas escaping through a small hole erodes the surrounding material. A one-millimeter pinhole becomes a five-millimeter hole, and a repair that would have taken twenty minutes becomes a replacement job.
FAQ
Does a flex pipe leak get worse over time?
Yes. Escaping exhaust erodes the material around the hole, and the vibration that caused the first failure keeps working on the rest of the braid. A small leak becomes a large one.
Can I drive with a flex pipe leak?
Short distances to a shop, generally yes. Long term, no — the cabin-air risk and the growing damage both argue against it. If you smell exhaust inside the car, get it fixed before your next long drive.
How do you fix an exhaust flex pipe leak without welding?
For a loose joint, retorque the clamp to spec. For a small hole, a patch clamp or high-temp putty will hold temporarily. For a frayed braid or an enlarging hole, there is no weld-free repair that lasts — replace the pipe.
Why does my exhaust tick when the engine is cold?
Metal contracts when cold and expands as it heats. A leak at a joint or a crack in the pipe opens widest when the parts are cold, then closes as they expand — so the tick is loudest at start-up and fades as the engine warms.
Do clamps or welds fail first on a flex pipe?
Usually neither. The braid between them fails first, because that’s where vibration stress concentrates. Clamp failures are the second most common, and they’re the easiest to fix.
The One Thing to Take Away
Next time the car is on a lift, have someone look at both ends of the flex pipe’s braid — where it meets the solid collar. That’s the earliest failure point, and catching it there costs a clamp instead of a pipe.
If the damage is already past that, work out the flex pipe replacement cost and the clamp price before you decide between a shop and doing it yourself.
Need a flex pipe or the clamps to go with it? LEDAUT supplies stainless steel flex sections and clamp hardware across common diameters — get in touch with your pipe size and we’ll match the part.